Subjects

Showing posts with label Light and Sound. Show all posts

Thursday, March 19, 2015

The Clock for Everyone

For our final Light and Sound unit we learned about time. We found out about time works, how it is measured, how the world started, and much more. We then focused on methods of telling time and learned about pendulums, sundials, geographic coordinates, etc. For our action project we were challenged to design a unique clock. I’m proud of the type of clock I invented, because it is to help people with disabilities which I think is important.

On the FE our class went on, to the Chicago Light House, something one of the head people of the organization said, stuck with me. He said "Blind people can do anything, as long as you give them a chance." So this was my way of trying to give them a chance to do something new.


Work Cited

-Aftelier Natural Perfume Wheel." Essential Oil UniversityRSS. Web. 16 Mar. 2015.

-Goodrich, Ward. "The Modern Clock; a Study of Time Keeping Mechanism; Its Construction, Regulation, and Repair : Goodrich, Ward L : Free Download & Streaming : Internet Archive." Internet Archive. Web. 16 Mar. 2015.

- Falcon, A. (n.d.). 20 Alarm Clocks To Wake You Up Creatively. Retrieved March 16, 2015, from http://www.hongkiat.com/blog/creative-alarm-clocks/

Wednesday, March 4, 2015

LEGO Guitar

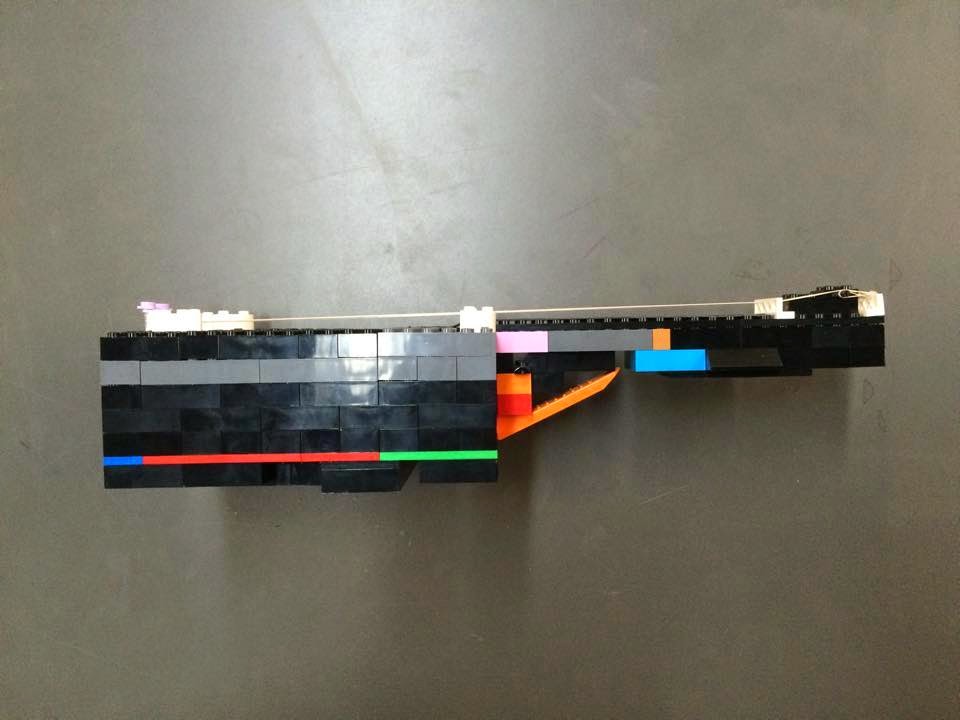
In our second Light & Sound unit we learned about what sound is, how it is made and heard, how it travels, and other fundamentals of sound. I am most proud of the science concepts learned such as how to graph sound waves and learning what each variable stood for. Our action project is about about creating sound waves and making an instrument that can be played by the Landfill Harmonic. We were each instructed to build a guitar from scratch. This would show how sound is produced and amplified.

The guitars we built work like a normal guitar: the strings vibrate the air, and the body amplifies the vibrations, projecting a louder sound. When you press on the strings you change the length of the vibrating which changes the pitch. The lower on the neck you go the higher the pitch.

The sounds the guitar makes show all the principles we learned. Sound waves are molecules contracting and expanding, which is shown on the guitar with the vibrating strings. They make vibrations in the air which are just contracting and expanding molecules. Wavelength is the distance from one peak/crest/trough to the next peak/crest/trough. The shorter the guitar string length the shorter the wavelength. Pitch/frequency is how fast a wave travels (how many cycles there are per second). Each string has a different pitch, and if you change the length of the string by putting your finger down, it will change the pitch. Amplitude is how high/low the wave is, the guitar’s body demonstrates this by amplifying the sound the strings make.The amplitude is how loud the sound is, the higher the amplitude, the louder the sound is.

All the dimensions are shown in the picture below. The rubber band width was .26 mm and the fishing wire width was .47mm. The volume of the body was 74 7/32 squared inches and the volume of the sound hole was 15 5/8 squared inches.
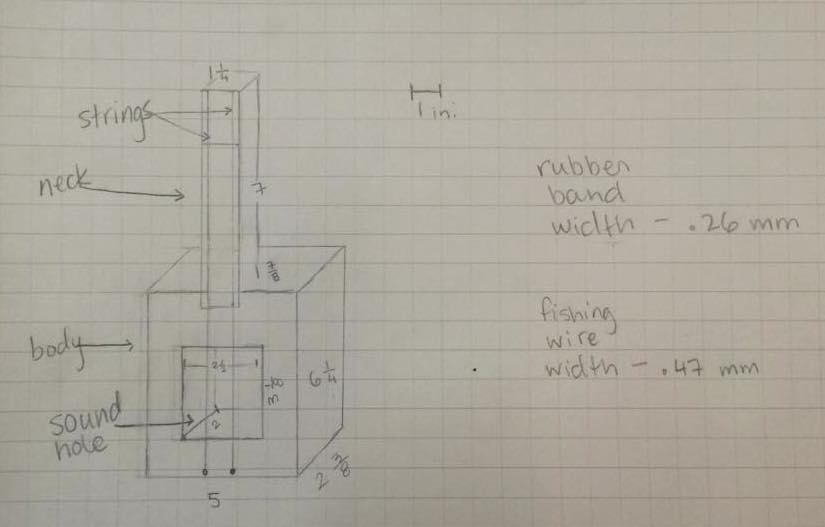
AG Guitar Sketch (2015)
After building the guitar we also found the frequencies and wavelengths of the open notes and the octave notes of both strings. The rubber band string was a G note, the open note frequency was 403.4 Hz and the wavelength was 185.8 cm, the octave note frequency was 806.8 Hz and the wavelength was 92.9 cm.The fishing wire string was an A# note, the open note frequency was 455.9 Hz and the wavelength was 657.6 cm, the octave note frequency was 911.8 Hz and the wavelength was 328.8 cm.
AG Guitar Front (2015)
AG Guitar Side (2015)
Another thing we learned about in this unit was the Doppler Effect; this is the phenomenon that makes a sound’s pitch seem to get higher as it travels towards you and lower as it travels away from you. Really the pitch stays the same the whole time, but it sounds like it changes because the waves get pushed together and overlap when the sound is moving towards you, and spread out when moving away from you.

I really enjoyed this action project and had fun making the guitar. However, if I could do this project again I would add more strings and add tuning pegs so I could change the tension of the strings as well. That way it would be even more like a real guitar.

Wednesday, February 11, 2015

Pin the Hole on the Camera

Our Light and Sound course is about, as stated, light and sound but also time, and how they all relate. It has to do with our perspective on the world and how it would be different if those three elements were different. Our first unit is Light where we discussed how light affects us and how we are able to see it. We learned about how we see light with our eyes, and how cameras make photos with a similar process. We also learned about lenses and the visible spectrum and many other things having to do with vision. I’m most proud of the science parts I learned in this class since it isn’t my strong suit.

For our action project we made pinhole cameras. A pinhole camera is pretty simple: you choose an object, such as a shoe box, that is completely black on the inside, and cut a hole in it. You then place a sanded down piece of tin with a tiny hole poked in it that acts as a lens. The light will shine through that lens when you uncover it, and when there is photo-sensitive paper inside, it will a picture will appear based on the light that comes through the lens.

AG Inside Pinhole Camera (2015)
AG Pinhole Camera (2015)


The math concept we used for this project was similar triangles.


x^2+y^2=z^2                             a^2+b^2=c^2                             

1 15/16^2+11 1/2^2 = 136^2     4 3/4^2+16 43/62^2 = 302.24^2

   z = 11.66                                   c =17.36                                     


The height of my pinhole is x which equals 1 15/16 inches
The distance from the lens to my paper is y which equals 11 ½ inches
The height of my subject is a which equals 4 ¾ inches
The distance from the back of my camera to my object is b+y which equals 28 6/31 inches
The distance from the lens to my object is b which equals 16 43/62 inches

The shutter speed that I tried the first time was 2 minutes and the second time was 4 minutes. Unfortunately the pictures didn’t show up because the pinhole wasn’t the right size, it was a little too small so the light didn’t come through enough. If I were to get a chance to redo the project I would make sure to fix that mistake.

JS Pinhole (2015)

This project shows the relationship between light and energy because when the light makes touches the paper it causes it to change color, which shows that is transferred its energy to it. I didn’t however think that the camera illustrated the idea of refraction because there wasn’t anything like water that would slow down the light, there was only air. Refraction involves light slowing down and bending so if that didn’t happen, refraction wasn’t shown.
As an addition we got to make photograms.This also involves using light sensitive paper, however you don’t use the camera and the pictures show up differently.


AG Photogram (2015)